
Wednesday, December 31, 2008
Free Left 4 Dead Sprays

Left 4 Dead - Remote Rcon with HLSW
The current version of HLSW is v1.3.0.6b and it runs on Windows 2000 and XP (see HLSW system requirements).
Once it is installed you will need to register an email address and password.
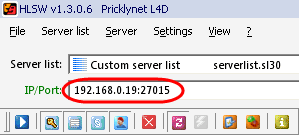
Once HLSW is running simply enter the IP of your server with the port:
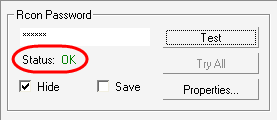
Type in the Rcon password and click Test. You should see Status: OK.
Click the Console tab and then type in your Rcon command in the field above and then click Send.
Tuesday, December 16, 2008
Left 4 Dead - Steam Group Server Settings
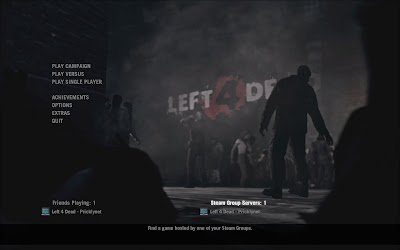
The advantage of this method is that you can invite players to your steam group and only those players will be able to play on the server - they will also see steam group servers when the game loads (so your server should be easy to join).
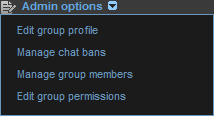
So the first step is to create a steam group. Once this is created the group admin (the person who created the group) will need to click on Admin Options and then Edit group profile to get the steam group ID.
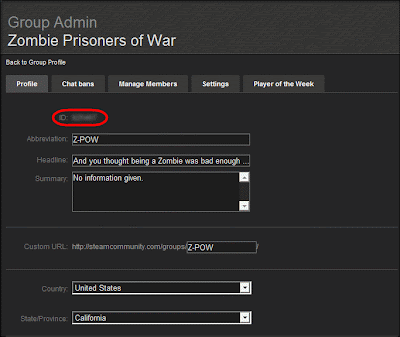
Once you have the steam group ID you can edit you server.cfg as follows, (where ###### is your steam group ID):
sv_allow_lobby_connect_only 0Then just invite your friends to the steam group and everyone should see your server listed in-game just like this:
sv_steamgroup ######
sv_steamgroup_exclusive 1
Saturday, December 6, 2008
Left4Dead - Linux - Idle Server Performance on ESXi

As you can see the actual CPU load reported by ESX when the Left4Dead server is idle peaks at 93Mhz which is pretty low if you ask me. (If I kill the Left4Dead server the CPU usage for that virtual machine drops to 6Mhz!)
Once I can get 4 friends playing I will post back the results to see the difference!
Left4Dead MOTD Banners
Originally I followed this guide but I ran into issues with the host banner which displayed html code rather than the image that it pointed to.

In the above screen you can see my customized host and MOTD banners along with the names of the files that control which images you see - host.txt for the host banner and motd.txt for the MOTD banner. These files are located in the /hlds/l4d/left4dead directory on your server.
Now the images that you select will be resized depending on the screen resolution of the players connecting to your server. So I made my images the following sizes (which should support a resolution of 1920 x 1080:
host banner - 605 x 121
MOTD banner - 1076 x 538
So I created both of my banners as .jpg files and uploaded them to photobucket.
Next we need to look at the html template that we need that will point to the images that we uploaded.
<html>
<head><title>Left 4 Dead 411</title></head>
<body style="margin:0px;padding:1px;background:#000000;">
<img src="URL for host or banner image" style="width:100%;height:100%;" />
</body>
</html>
Copy and paste this into two new files named host.html and motd.html - just make sure that you change the "URL for host or banner image" part according to your URLs for the host or banner images on photobucket.
Upload host.html and motd.html to some webspace that allows public access - I used Sitesled to host mine for free!
On the server you just need to edit host.txt to contain the URL to your hosted host.html file and then edit motd.txt to point to your motd.html URL.
Now in theory you should be able to put the contents of the .html files that we created directly into the host.txt and motd.txt files on your server and have it work - but I found that (for whatever reason) the host banner simply would not work - it displayed html code instead of the banner image. That is why I hosted mine as .html files - and once I did that everything worked.
The only additional issue that I had is that the motd image seems to be resized smaller and then streched slightly (rather than being viewed at its native size) at higher reolsutions - so my advice (if you experience this issue) is to keep your text fairly large so that your MOTD does not look bad.
So here you can see what the host banner looks like in game by pressing the Tab key.
Stuttering Gameplay on (AMD) Dual Core Systems
L4D was completely unplayable ...
So I installed the AMD Dual Core Optimizer and hoped that this would fix the issue - but alas it did not.
The solution that I found was to disable Multicore Rendering in the Video Options as follows:
Let's hope that there is a permanent fix from Valve soon!
Friday, December 5, 2008
Outbreak Achievement
There is some speculation that Valve designated a few players as infected with this rare strain and that these players pass it on to others through some kind of contact, such as covering them in boomer bile, for example. Maybe you have to make "contact" more than once to successfully pass the infection along even?
I remember a couple of days ago getting the Big Drag achievement by snaring the same player three times in a row on a single life as the smoker, so maybe that was when I passed it on? It would make sense to me that the infected are the ones that pass it on - what do you think?
Left4Dead Update - Dec 5th 2008
Fixed Infected Players melee pushing large objects to block the survivors path
Fixed +lobby exploit
Fixed exploit of "hugging" the Witch from behind where she can't hit you
Fixed players not being kicked from a vote by changing their name before it succeeds
Disabled difficulty change votes from the console in versus mode
Left4Dead Update - Dec 4th 2008
Finding a dedicated server when starting the game from a lobby is now faster and more reliable
Versus mode is now locked to Normal difficulty
Difficulty on a server is now locked to the one set by the lobby reservation
Fixed lagouts/spikes after level transition
Fixed directory issue with spray logs in some cases
Fixed video settings not saving after closing video options dialog
Corrected a boomer suicide exploit
Several minor localization fixes
Fixed disabling cheats incorrectly resetting data
Sunday, November 30, 2008
Left 4 Dead - Private Dedicated Ubuntu Server 8.1
Note: a dedicated server will be installed on either on a dedicated physical machine or in a virtual machine with dedicated resources, and should be configured with a static ip address [either in the networking configuration or via a DHCP assignment in your router]. I have my server running in a virtual machine ...
The first thing that we need to do is download Ubuntu Server 8.1 [click on the tab for the Server edition and then select a download location to download the .iso file].
If you are installing a Virtual Machine boot from the .iso, press F4 on the first screen and select "Install a minimal virtual machine" - this will install version 8.1 of Ubuntu JeOS. Otherwise install a vanilla installation of Ubuntu Server on your box. The first two pages of this guide will show you step by step how to install Ubuntu Server (we will assume that the account for the Ubuntu installation is "l4d" and not administrator).
Note: For my virtual machine I set aside 10Gb of disk space - you may be able to get away with less, but as you can see Ubuntu JeOS and Left 4 Dead occupy almost 3 Gb on /dev/sda1:

Now that we have the preliminaries taken care of let's update the installation:sudo apt-get update
Upgrade the install:sudo apt-get upgrade
Install SSH for remote management:sudo apt-get install openssh-server
Install Wget so that we can download a necessary file:sudo apt-get install wget
Create a directory for the Left 4 Dead installation and then cd into the new directory:mkdir hlds
cd hlds
Download the hldsupdatetool:wget http://www.steampowered.com/download/hldsupdatetool.bin
Make the hldsupdatetool executable:chmod +x hldsupdatetool.bin
Run the hldsupdatetool:./hlsupdatetool.bin
Type yes to the agreement and then click enter to continue.
Make Steam executable:chmod +x steam
Run Steam to download the Left 4 Dead files:./steam -command update -game l4d_full -dir /home/l4d/hlds
Note: you will most likely be prompted to run the last command again as the first time it runs it will update steam and not install Left 4 Dead.
Left 4 Dead files will now install to /home/l4d/hlds/l4d\left4dead\ - this may take some time, so you may want to make a few cups of tea or something ...
Once the download is complete we need to create a server configuration file [server.cfg] and a script to run the server with particular parameters.
Create a file called server.cfg and copy it [using SSH if necessary] to /home/l4d/hlds/l4d/left4dead/cfg.
Your server.cfg should look something like this:hostname "Left 4 Dead"
rcon_password "myrconpassword"
sv_allow_lobby_connect_only 0
sv_password "mypassword"
Change the hostname to whatever you want. The rcon password is for remote administration of Left 4 Dead when the server is running. sv_allow_lobby_connect_only 0 allows for players to connect directly to your server without using the Left 4 Dead lobby system. sv_password sets a password for gamers to play on your server.
Now create a file called autoexec.cfg (in the same folder as server.cfg):
z_difficulty normal
z_difficulty normal sets the default difficulty of the server to normal - you can set this to easy, normal, hard, or impossible.
Next we will create a script to run the game server as follows:#!/bin/bash
cd /home/l4d/hlds/l4d
./srcds_run l4d -autoupdate -console -maxplayers 8 + sv_lan 0 +hostip xx.xx.xx.xx +ip xx.xx.xx.xx +hostport 27015 +exec server.cfg +map l4d_hospital01_apartment
Save the script as "startl4dserver.sh" and upload it to the home directory of the server.
-console: This will display a console that you can type commands into.
-game left4dead: This specifies that the server will run Left 4 Dead.
-maxplayers 8: This will specify the maximum number of players the server will allow, setting it to 8 should allow you to use versus mode, otherwise set it to 4 for survivors only gameplay.
-autoupdate: This will make the server check and update to the latest version when you launch it but this needs a manual fix to work properly.
+hostip: where xx.xx.xx.xx is your WAN address.
+ip: where xx.xx.xx.xx is the static LAN address configured earlier.
-port 27015: This will specify the port for the server to run on [27015 is the default port]. +sv_lan 0: This will force the server to run on the internet instead of just on a lan.
+map l4d_hospital01_apartment: This will specify the map that the server will start with [and must be configured]. You will find all the available map names on your server here: /home/l4d/hlds/l4d/left4dead/maps
At this point you can run the server as follows:./startl4dserver.sh
To connect to the server from your (LAN) gaming machine you will need to enable the "Developer Console" in the game options as follows: At the main menu, select "Options", then choose the "Keyboard/Mouse" selection. Enable the "Allow Developers Console" option.
You can then use the ~ key to bring up the console and then type:connect xx.xx.xx.xx
Where xx.xx.xx.xx is the LAN ip address of the server.
To allow internet users to connect you will need to open ports 27000 to 27050 in your router firewall. I also forwarded 27015 directly to the server LAN address just for good measure.
Friends connecting from the internet will then be able to connect to the WAN ip address of your server using the password that you provided them.
Note: if your router supports it you may be able to dispense with +ip and +hostip in your command line. If this is the case you will simply be able to connect to your server from a LAN PC by connecting to you WAN address.


